My Planetary Datacenter I: Architecture
• ☕☕☕☕☕ 12 min read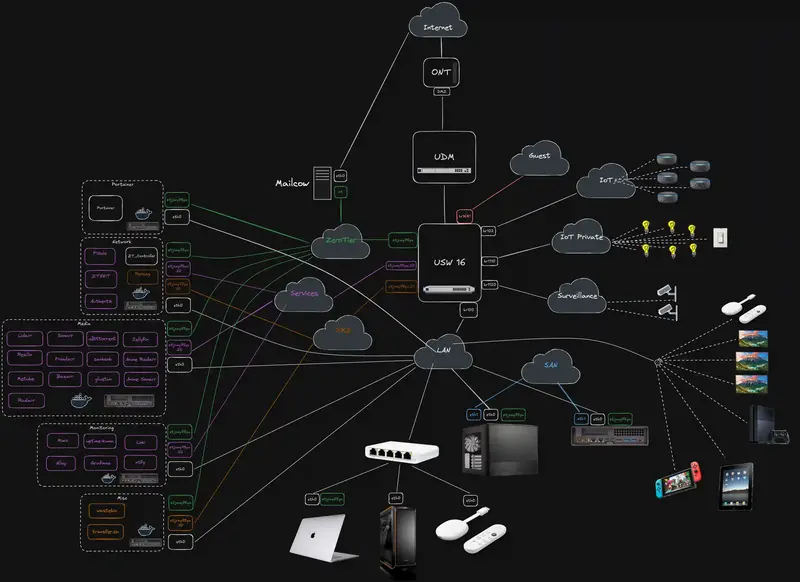
Welcome to the first post in what I’m calling my “Planetary Datacenter” series. Essentially, I’ve got a homelab that I’ve been tinkering with for a while, building, refining, and sometimes breaking it (on purpose!) to learn how to make it better. Now, I’m ready to share everything I’ve learned so far.
I jokingly refer to my setup as a “Planetary Datacenter” because it stretches beyond just my house. Thanks to clever networking and tools like ZeroTier, I can place services just about anywhere on the globe (hence “planetary”) and still have them communicate as if they were right next to each other on my local LAN. If you’re into homelabs, networking, or just curious about how to structure your own multi-machine environment, stick around.
I’ll walk you through all of it.
What is the “Planetary Datacenter” anyway?
I first introduced this idea at a CNCF Galicia talk, where I discussed how I use ZeroTier and WireGuard to interconnect various machines. Over time, I realized that combining ZeroTier with my local hardware gave me a pretty powerful setup: everything in one “big” virtual LAN, accessible anywhere.
So, if you picture your typical data center with racks and servers, now shrink it down to something you can manage in your living room or home office, then magically extend it worldwide. That’s basically the idea.
Why bother with something this complex?
-
Learning & Fun: I love experimenting. Homelabs are a great way to learn networking, virtualization, and new software.
-
Centralizing Services: With this setup, I can keep my personal data and services under my control, especially stuff like media servers, backups, and specialized containers.
-
Planet-Wide Access: I can spin up a new service on a VPS, at home, or in a cloud provider. As soon as I hook it up to my ZeroTier network, it feels like it’s right there on my LAN. And in a worst case scenario, migrating can be done with a click of a button.
Physical Infrastructure at Home
I’ll start by breaking down the hardware so you know what I’m working with.
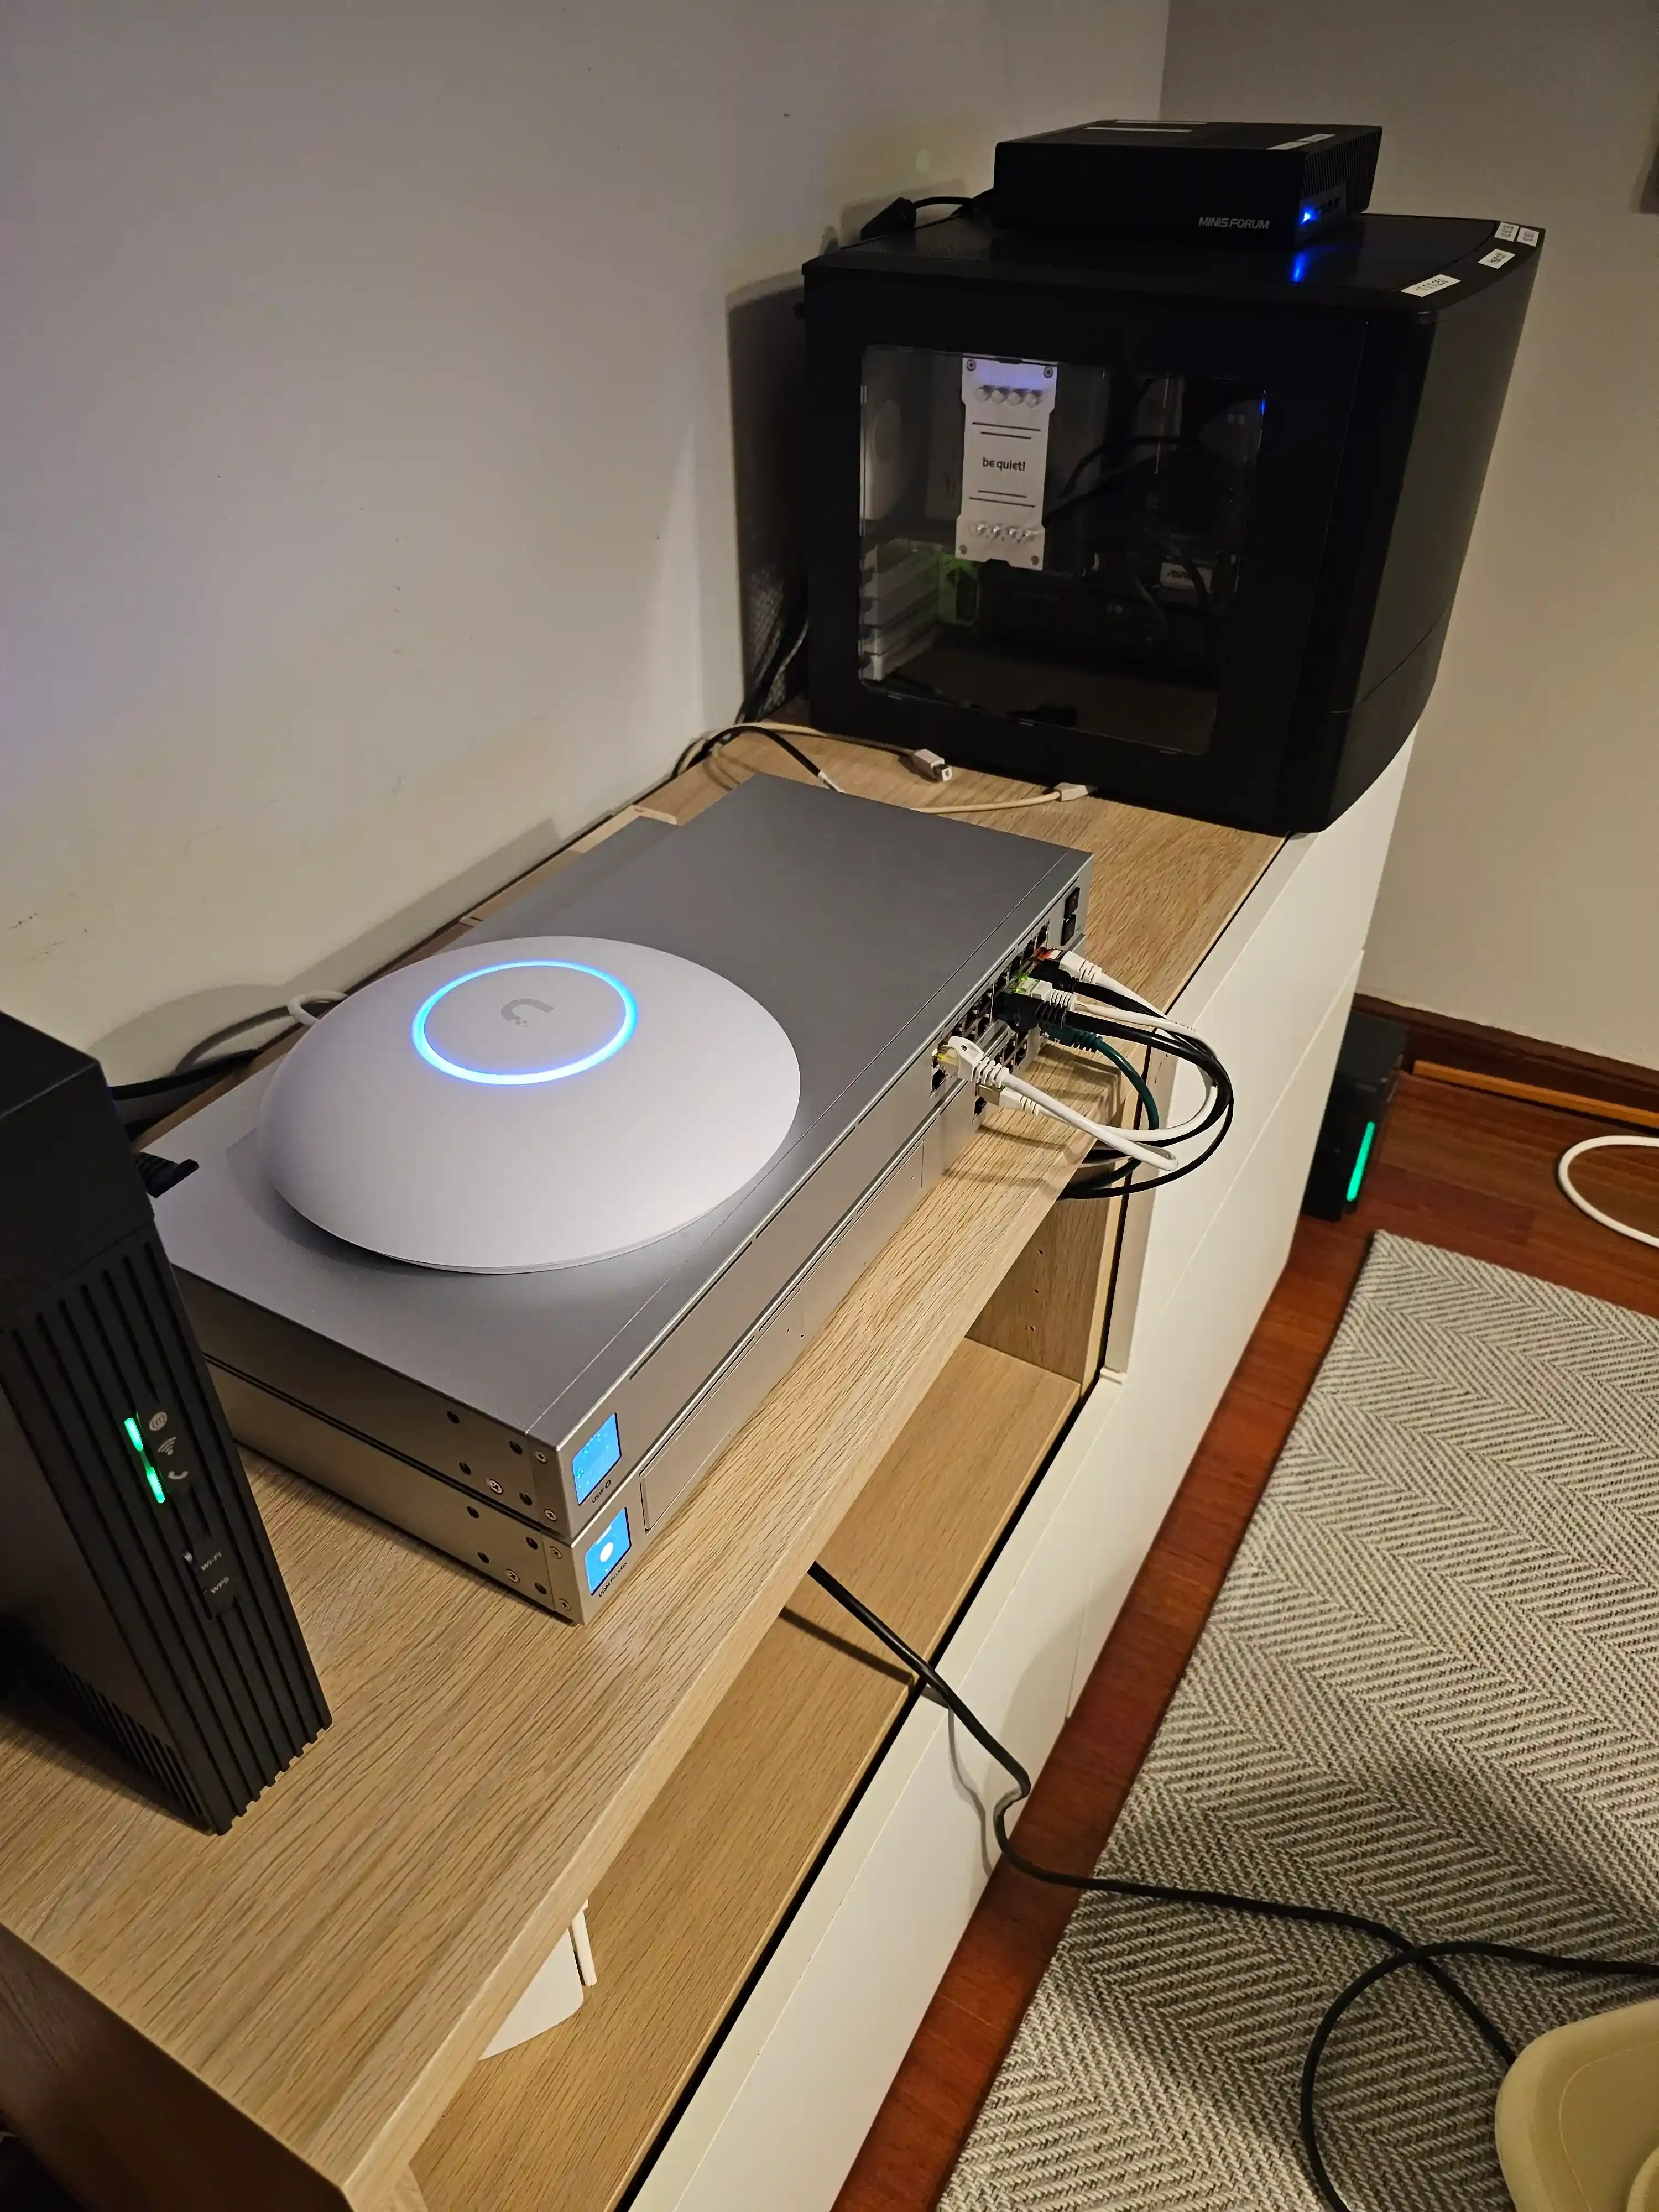
ISP Router & Ubiquiti hardware
My ISP router is basically acting as a pass-through device. I’ve set it up with DMZ mode pointing straight to my UDM Pro Max. The UDM is the nerve center of my home network. It handles VLANs, firewall rules, and all the fancy Unifi-based management. If you’re familiar with the Unifi ecosystem, you know it’s pretty user-friendly yet powerful enough to do some advanced stuff if you know how to hack it enough.
Switches & Access Points
-
USW 16 PoE Switch: Handles both power (PoE) for devices like Wi-Fi access points and general switching duties.
-
U7 Pro AP: My main Wi-Fi access point.
-
USW Mini: A tiny switch I use for some client machines (like my Mac and a Windows machine).
Main Machines
-
NAS TrueNAS Scale
-
CPU/RAM: Intel i5-7600K, 16GB RAM
-
Storage: 1×1TB SSD for the OS + 4×16TB HDD in a ZFS “striped mirrors” arrangement.
-
Role: Holds all my data, shared mainly over NFSv4.2.
-
-
MS01 Proxmox Server
-
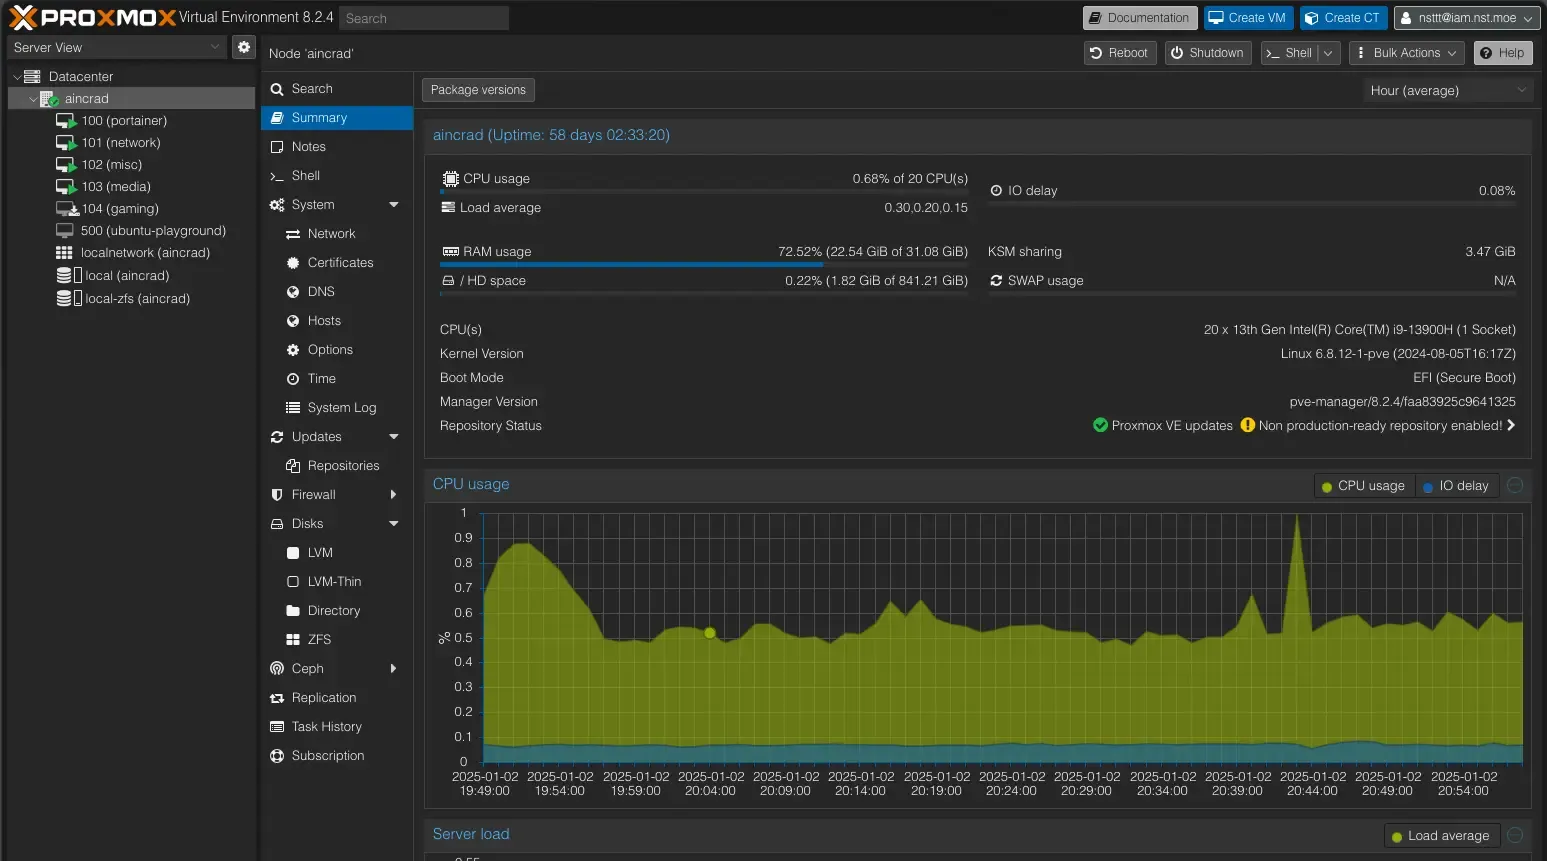
CPU/RAM: Intel i9-13900H, 32GB RAM
-
Storage: 2×1TB NVME in RAID1
-
Special Trick: I fitted it with a modified Intel ARC A380 GPU for hardware transcoding (swapped in a smaller heatsink from an ARC A310).
-
Role: Runs Proxmox, which hosts multiple VMs for all sorts of services (media, networking, Portainer, etc.).
-
VLANs & Wi-Fi Networks
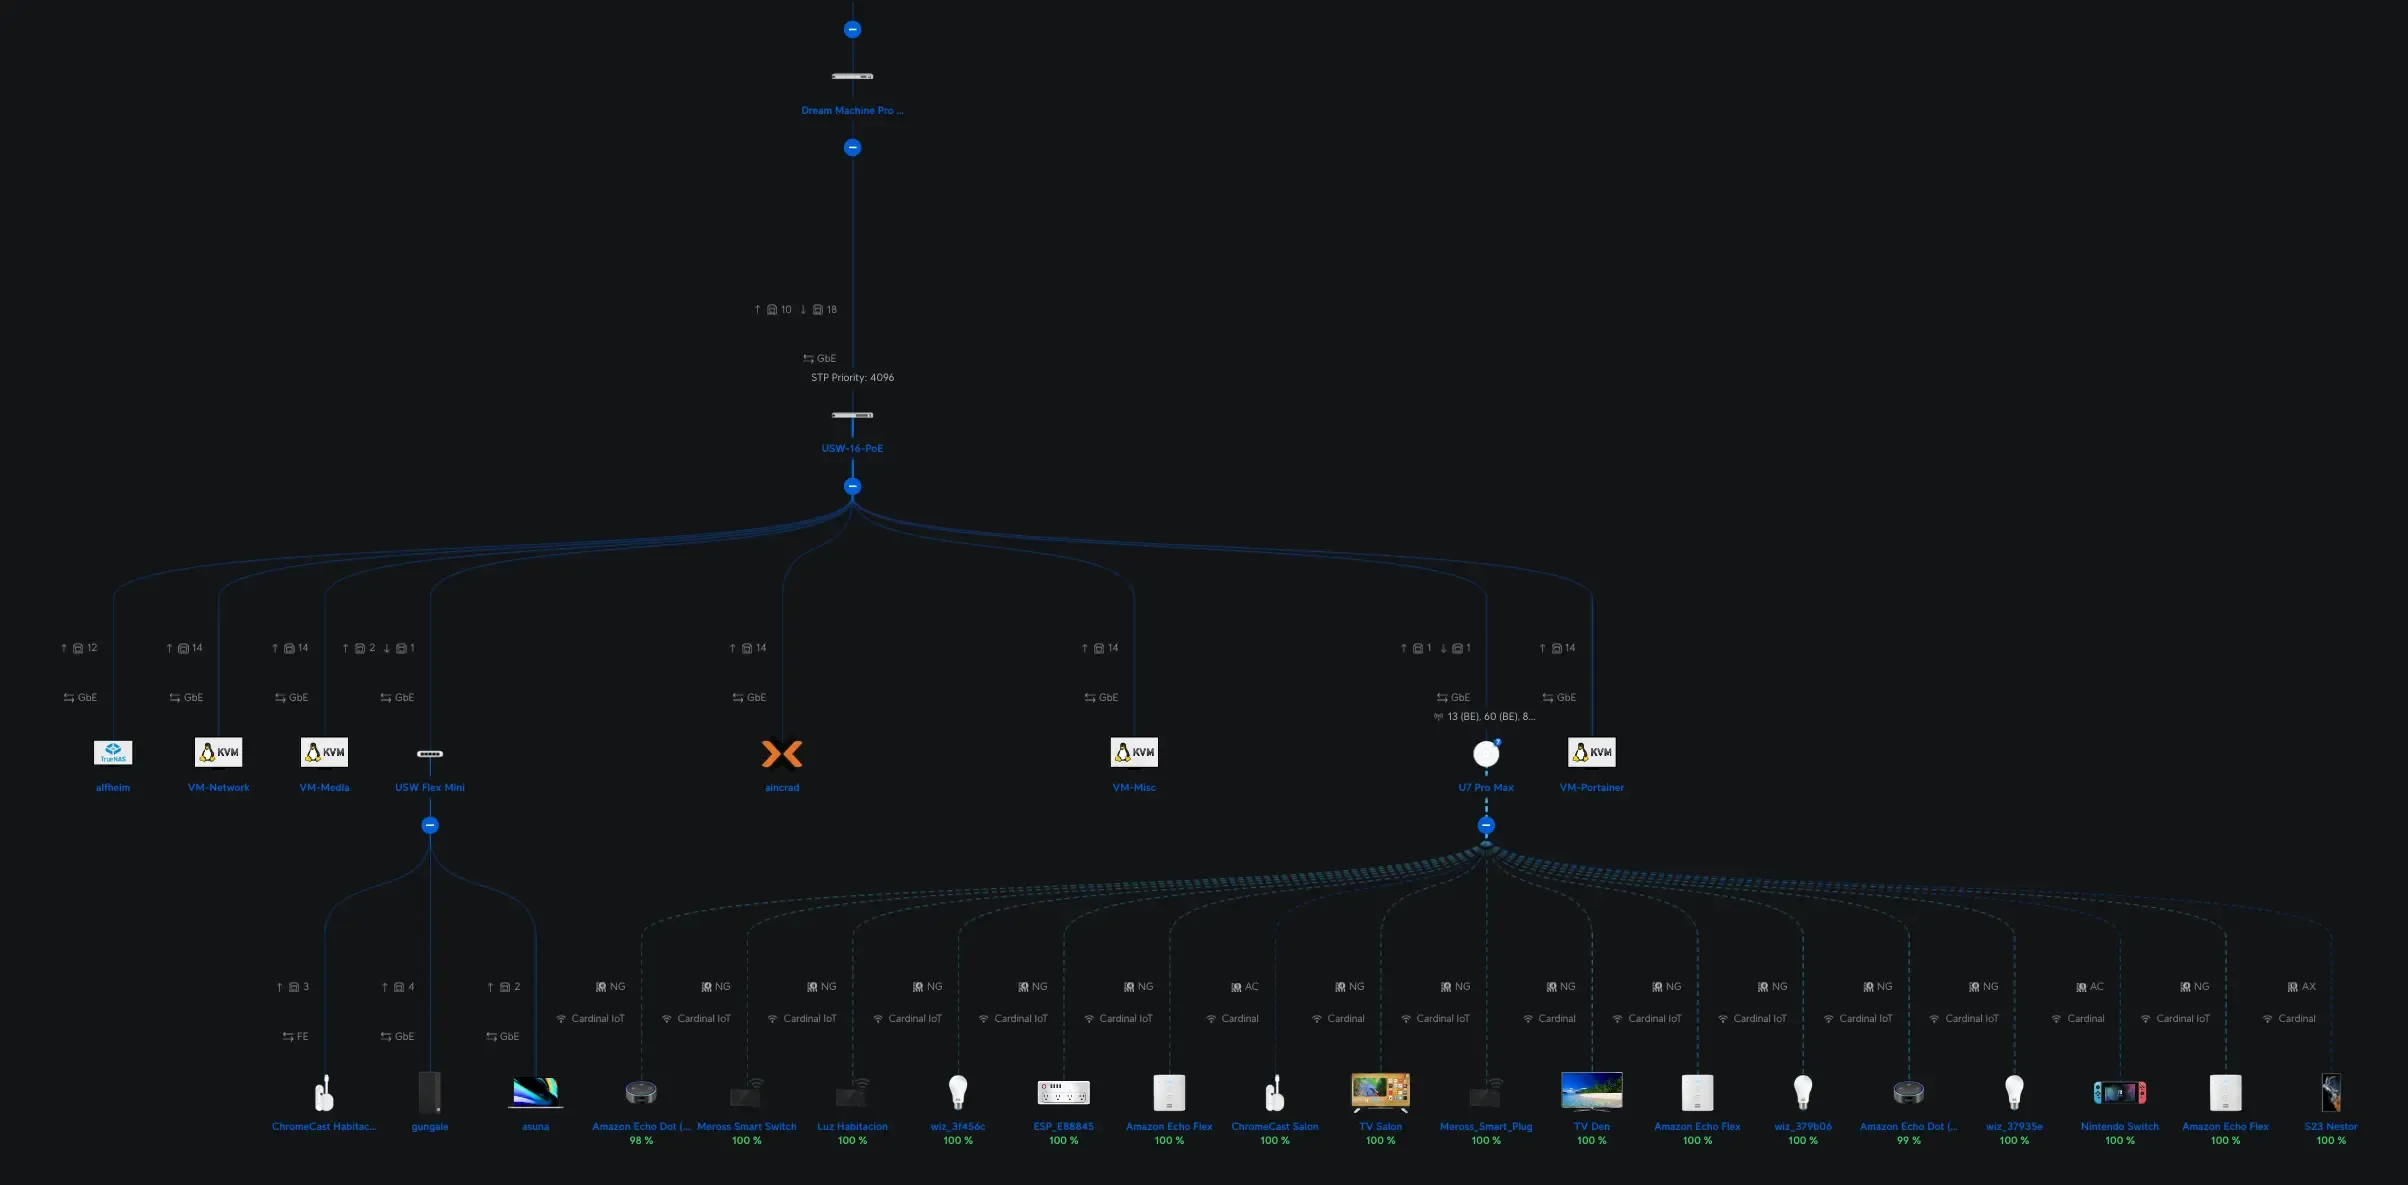
VLANs (or Virtual LANs) let me split up my network into smaller segments, keeping different types of traffic isolated from each other. Here’s what I have:
-
LAN: The default network for my local machines and most VMs.
-
Guests: For visitors, restricted access, minimal privileges.
-
IoT & IoT Private:
-
IoT: For general smart bulbs, plugs, and devices that do need internet access.
-
IoT Private: For devices that are strictly local (no external communication needed).
-
-
Surveillance: Dedicated for cameras. They don’t need broad network access or the internet, so this VLAN keeps them isolated.
-
Services & DMZ: These VLANs exist in the UDM Pro config but are primarily used in conjunction with ZeroTier.
Wi-Fi Networks
-
Cardinal (Main Wi-Fi): Tied to my LAN VLAN.
-
Cardinal Guest: Segregated, on the Guest VLAN.
-
Cardinal IoT: A 2.4GHz-only SSID for IoT devices. It uses pre-shared keys for network segregation based on SSID password.
-
Cardinal IoT: For IoT devices that uses the internet somehow.
-
Cardinal IoT Private: For local-only IoT devices with no internet access.
-
Cardinal Surveillance: For camera devices, same concept as the private one but as a separate VLAN.
-
The Role of ZeroTier
I create two VLANs in ZeroTier, VLAN 2 (Services) and VLAN 3 (DMZ), then I bridge them back into my local Services and DMZ VLANs on the UDM Pro.
This bridging is done via some custom scripts and the UDM’s “persistence” system. Because ZeroTier operates at Layer 2, it’s not just simple routing, it’s effectively replicating the broadcast domain. It might be a bit of a hack, but it allows ZeroTier traffic to flow in and out of my local VLANs as if they were physically plugged in.
Additionally, ZeroTier includes a powerful rules engine. This allows me to define custom firewall-like policies, such as disallowing certain VLAN-tagged traffic, restricting specific ports, or enforcing IP-based rules, directly within the ZeroTier network. That means I can shape traffic based on my exact security needs while still giving devices full Layer 2 connectivity when appropriate.
Why ZeroTier Is at the Core
ZeroTier basically gives me an encrypted overlay network that all my devices, home-based, in the cloud, or in someone else’s data center can connect to. It creates a “planetary virtual switch,” letting me hand out IP addresses on VLAN 2 (for general services) or VLAN 3 (for internet-exposed services).
For example, if I spin up a VPS in some random location, I just install the ZeroTier client, join my ZeroTier network, and give it an IP in VLAN 2 or VLAN 3 and boom, it’s as if it’s plugged into my home switch. That’s the “planetary” part!
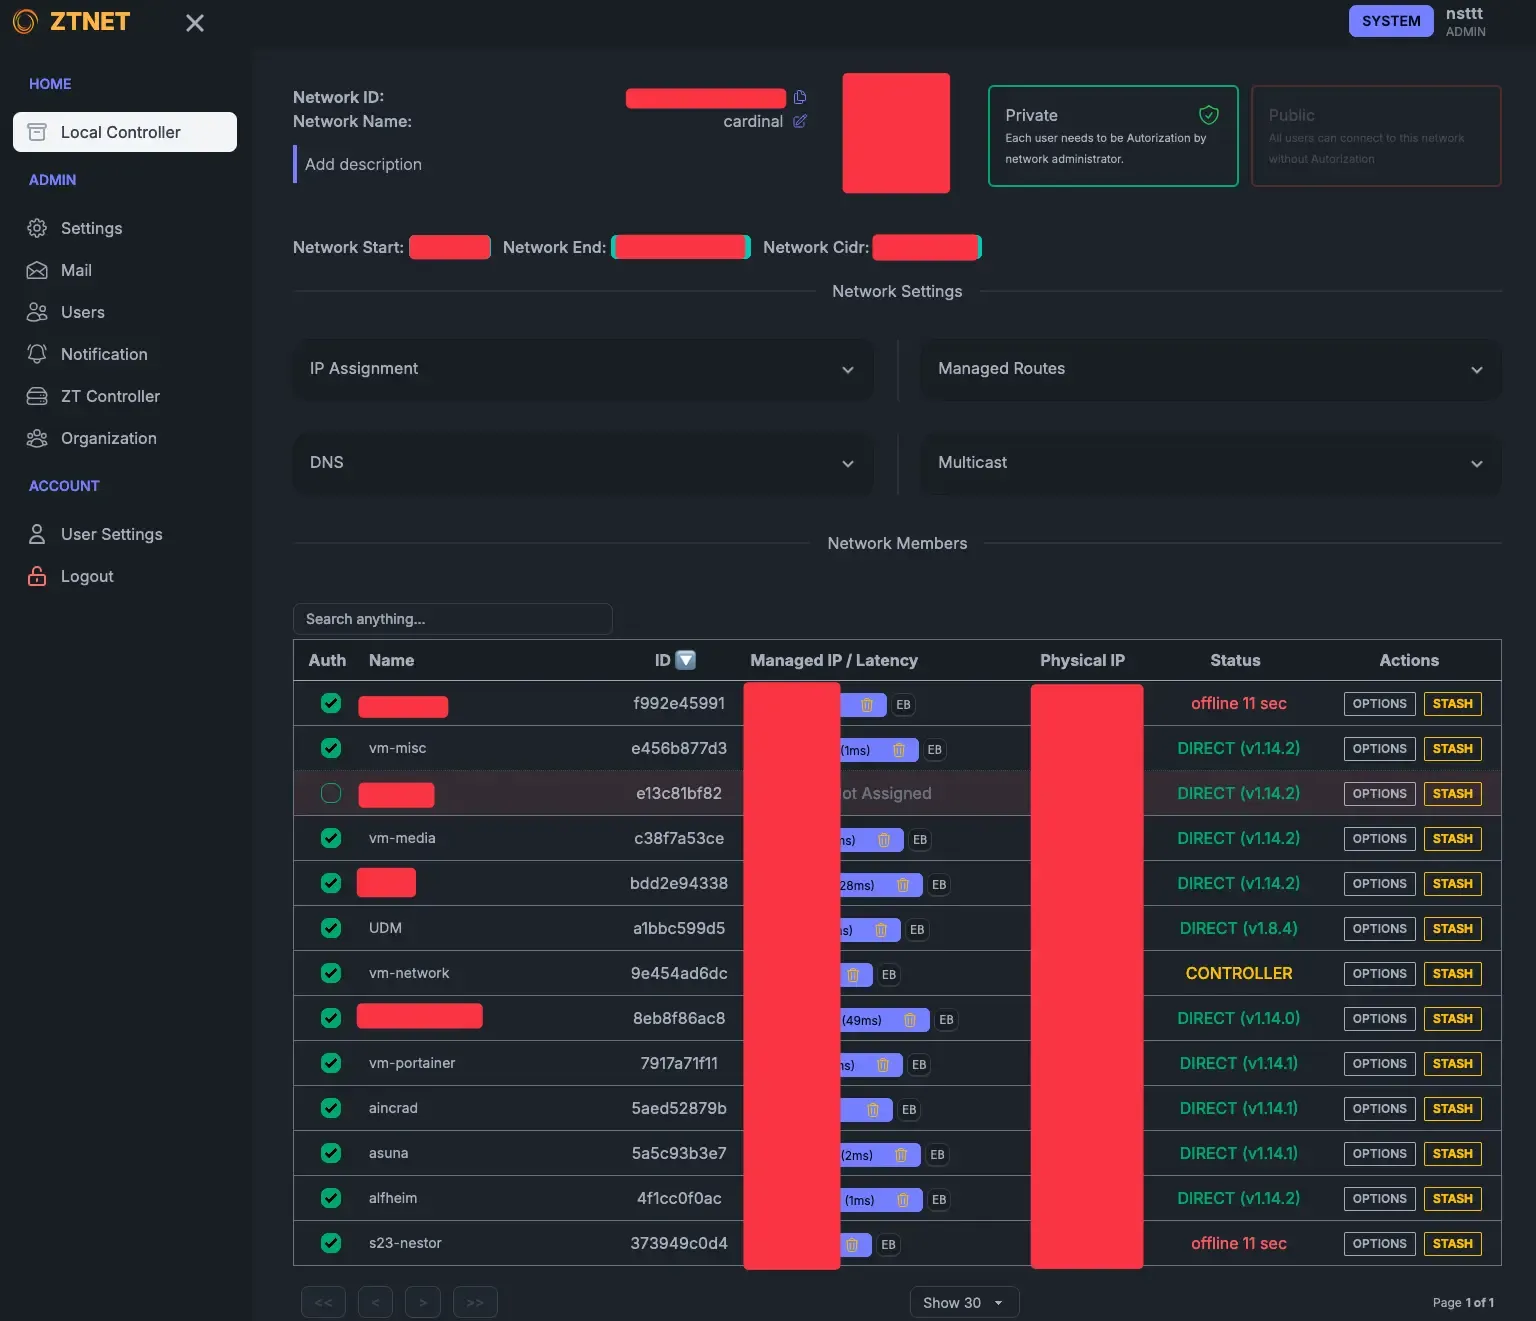
I self-host the ZeroTier controller instead of relying on the official ZeroTier infrastructure. Since ZeroTier is open-source, I can run my own controller node on my Network VM.
To make management easy, I use a community-built UI that gives me a web dashboard for seeing which devices are connected, assigning IP addresses, and approving or denying new join requests. It’s containerized using a Docker MacVLAN trick we will talk later about, so it’s directly available on VLAN 2 without any weird network hoops.
This approach also ensures I’m in full control of my environment: if the official ZeroTier services ever go down, I’m still good to go, and I can customize every aspect of my network as I see fit.
TrueNAS & Proxmox
TrueNAS Scale
On my NAS, I’m not using many of TrueNAS’s built-in virtualization features. Instead, it’s mostly:
-
Storage: A few major datasets.
-
Network: I install ZeroTier directly on TrueNAS to ensure it can talk to other machines over the overlay network.
-
Performance: The 1TB SSD is for the OS, and the 4×16TB EXOS drives are in ZFS striped mirrors. This gives a nice balance of capacity, speed, and redundancy.
I also have a direct SFP+ connection between my NAS and the Proxmox server (MS01) for faster data transfers. That means all my VMs can access NFS shares at 10GbE speeds, which is super handy for big data or media workflows.
Why NFSv4.2?
I’m using NFSv4.2 mainly because it builds on earlier versions while adding a bunch of super handy extras. Here’s a quick rundown:
- NFSv3 has been around forever and is rock-solid, but it doesn’t include modern security or integrated locking (it relies on separate protocols like NLM).
- NFSv4 unified the protocol, locking, and security into one standard, making life easier and reducing extra sideband protocols.
- NFSv4.1 introduced Parallel NFS (pNFS), which lets you read and write data in parallel across multiple servers for better performance when you need to scale out.
- NFSv4.2 takes it all a step further with features like server-side copy, improved sparse file handling, and extended attributes. This makes it especially handy for virtualization and container workloads where you need faster data movement without pounding your network.
Basically, NFSv4.2 gives me a modern, flexible, and efficient setup, perfect for my homelab needs.
Proxmox Server Node (MS01)
This is my “big” server with an i9-13900H and 32GB of RAM. I also popped in a custom Intel ARC A380 GPU for hardware transcoding (like Jellyfin) because Intel excels at that. Here are some highlights:
-
Microcode Patches: If you’re using a new-gen Intel CPU, you might need microcode patches to avoid weird performance or stability issues. Here’s the Proxmox microcode script if you want to have a look at it.
-
GPU Passthrough: Proxmox makes it pretty straightforward. You just enable Intel IOMMU in the grub config, load the vfio modules, and pass the GPU through to whichever VM needs it.
-
VMs: I run four main VMs. Portainer, Network, Media, and Misc.
VM setup
One of the key pieces of this setup is a Docker MacVLAN interface approach that allows my containers to attach directly to the ZeroTier VLAN interfaces.
It keeps host networking simpler and gives each container a dedicated IP isolated to the ZeroTier VLAN.
How it works
In Docker, I create a MacVLAN interface bound to the ZeroTier interface. That way, each container in that network appears on the ZeroTier VLAN with its own MAC address (and IP) instead of piggybacking on the host OS. This method isolates container traffic cleanly from the VM’s main interface, which helps when bridging or routing across different VLANs.
Portainer VM
-
Runs on Ubuntu 24 nothing fancy installed.
-
Docker + Portainer so I can have a nice web UI for managing all my containers.
Network VM
-
Also Ubuntu 24, but here’s where I keep network-related containers:
-
ZTNET a cool community-built ZeroTier controller UI (built with the T3 Stack!!)
-
Pi-hole for my private DNS.
-
Nginx Proxy Manager reverse proxy for my services.
-
Authentik my identity provider, or IdP.
Media VM
-
This is my entertainment hub. It has the full *Arr suite. If you have no idea what that is, take a look at the wiki.
-
GPU passthrough is set up here, so Jellyfin can do hardware transcoding with the Intel ARC card.
-
All config folders and downloads get mapped to the NAS’s NFS shares, so everything is in one central spot.
Hardlinks & NFS
I’m using hardlinks so that I can have a file appear in multiple places (like the “downloads” folder and the final “TV Shows” folder) without doubling the storage cost.
You just have to be consistent with your paths in Docker Compose, NFS shares and your *Arr apps, so everything references the same “root” mount point.
Misc VM
- A catch-all for small projects or services that aren’t big enough to warrant their own machine.
GitOps and Docker Compose
I’m a huge fan of Docker Compose because it’s easy, fast, and reproducible. I keep a Git repo with all my Compose files and volumes declared. If I ever blow away a VM or want to spin up a new environment, I just clone the repo and run docker compose up.
Why Portainer?
I like to pair this Git-based workflow with Portainer because it gives me a simple, intuitive UI on top of my Docker environment. While Docker Compose keeps everything version-controlled and scriptable, Portainer ties it together with a dashboard that shows all my containers, volumes, networks, and logs in one place.
It even has built-in GitOps-style features, like pulling changes directly every so often from your repo or using webhooks, so you can keep everything updated automatically. That means I don’t have to drop into the CLI just to check container statuses or tweak settings. I can do it all from my browser.
If you know of any other tools that offer a similar UI-driven approach and integrate well with GitOps, let me know! I’m always on the lookout for alternatives.
Why not LXC?
While LXC can be more lightweight and can potentially yield better performance, it’s just trickier to replicate consistently. If you know a way to make LXC more reproducible, I’d love to hear it! Hit me up on Twitter.
Also, hooking up NFS inside an LXC can get messy with permission issues and restricted container access.
With Docker Compose, I can easily map volumes from my NAS (especially the config volumes) and keep the setup modular.
Coming Up Next
This was just the general overview. In future posts, I’ll dive deeper into specifics like:
-
UDM Pro VLAN Bridging: Exactly how I got ZeroTier VLAN 2 and VLAN 3 to mesh with the UDM and hacking the UDM’s persistence system.
-
GPU Passthrough Step-by-Step: The commands and configurations I used in Proxmox.
-
Arr Services and Hardlink Magic: A deeper guide on making *Arr apps handle hardlinks smoothly.
-
Nginx Proxy Manager + Authentik: How I secure external services while letting them stay easy to reach from anywhere.
-
ZeroTier: More on how I set up ZeroTier.
-
GitOps: How I manage my Docker Compose files and volumes with Git.
-
Monitoring & Alerts: How I keep an eye on everything through Grafana, Alloy, and other tools.
Wrapping Up
So, that’s the broad overview of my Planetary Datacenter, my homelab that thinks it can conquer the world (or at least my corner of it).
As I keep iterating on this setup, I’ll share everything I learn, mistakes, discoveries, and hopefully some cool tips. If you have any questions or want to suggest your own improvements, drop a comment (or tweet, or smoke signal, whichever you prefer). I’d love to hear how you’re tackling similar homelab challenges.
Stay tuned for more detailed breakdowns, and thanks for reading!
